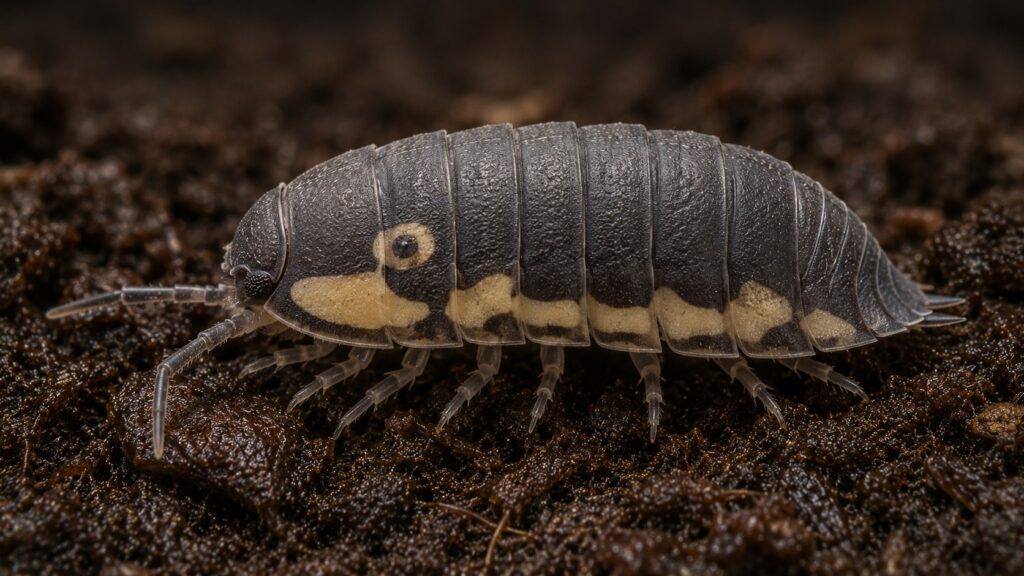
Rubber ducky isopods are the species that pulled a lot of people into this hobby, usually via a photo that looks retouched and is not. Cubaris sp. “Rubber Ducky” carries a pale marking along each side that reads unmistakably as a duck’s bill and eye, on a body barely half an inch long. They were once a four-figure conversation and now sit in reach of a patient hobbyist. What has not changed is that they are slow, moisture-hungry, and unforgiving of a bin that dries out or overheats. This guide covers the substrate recipe, the humidity range, why limestone matters, realistic breeding expectations, and what they actually cost now.
Species Overview
Rubber duckies come from limestone cave systems in Thailand and remain formally undescribed, which is why every listing says Cubaris sp. rather than a proper species name. That cave origin drives the entire care sheet. They evolved in a place that is dark, permanently humid, thermally stable, and coated in calcium carbonate.
Adults reach roughly 0.5 inches, with a dark grey to charcoal body and the cream coloured lateral patch that gives them the name. Markings vary between individuals and between lineages, and some bloodlines show the “duck” far more clearly than others.
They are placid, slow moving, and spend most of their time under cover. This is not a display species that patrols the glass. It is a species you find by lifting a piece of cork bark.
| Attribute | Details |
|---|---|
| Scientific name | Cubaris sp. “Rubber Ducky” |
| Adult size | 0.4 to 0.6 inches |
| Lifespan | 2 to 3 years |
| Difficulty | Intermediate to advanced |
| Temperature | 70 to 78F (21 to 26C) |
| Humidity | 80 to 90% |
| Brood size | 8 to 20 offspring |
Enclosure Setup
A 6 quart clear plastic bin suits a starter group of 10 to 15. Resist going larger. A big bin with a small colony makes it nearly impossible to judge population, and Cubaris do better when the microclimate is easy to hold steady.
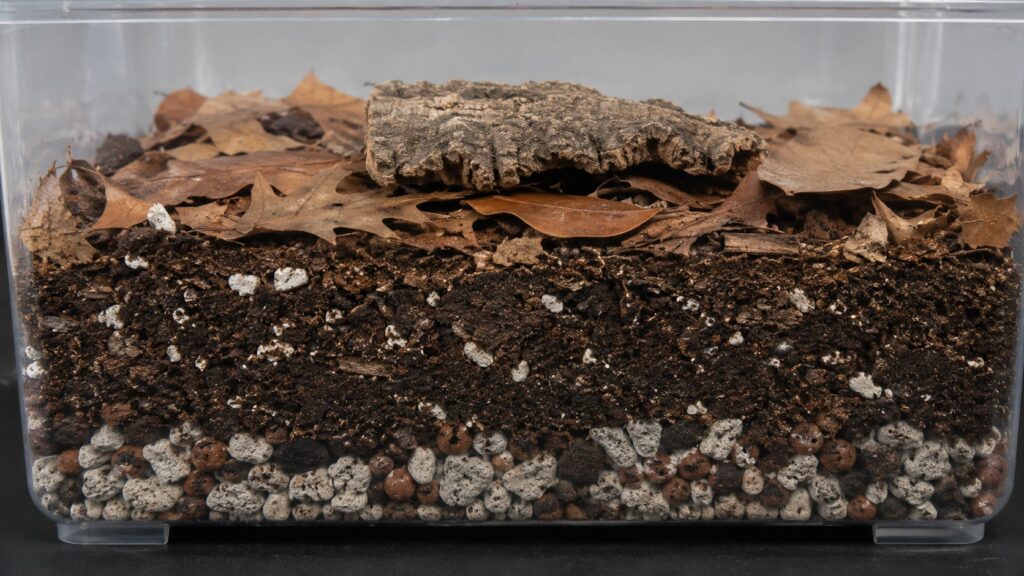
Drainage layer first. Two thirds of an inch of lava rock, leca, or coarse orchid bark at the bottom, so excess water has somewhere to go rather than souring the substrate.
Substrate, 3 to 4 inches deep, mixed as roughly:
- 4 parts coconut fibre or peat
- 2 parts orchid bark or crushed dead hardwood
- 1 part crushed limestone, oyster shell, or coral sand
- 1 part sphagnum moss, torn up and worked through
The limestone component is not optional decoration. Cave species draw heavily on calcium carbonate for their exoskeletons, and colonies kept without a mineral source stall out and molt badly.
Cover. Layer the surface thickly with dry leaf litter, magnolia and oak being the two standards, plus a few pieces of cork bark laid flat. Rubber duckies live under things. The more secure hiding cover you provide, the more you will actually see them, because a colony that feels exposed simply stays buried.
Ventilation. This is the balance point of the whole setup. Punch a modest number of pinholes high on two opposing sides, enough for cross flow and no more. Too much and the humidity collapses. Too little and you get mold and stagnant air. Start conservative and add holes if you see mold blooming.
Moisture gradient. Keep one third of the bin wet, one third middling, one third barely damp. Pour water down one wall to rewet rather than misting the surface. The same layering logic applies across the genus and is worth reading alongside setting up an isopod bin for the general principles.
Temperature and Humidity
Target 70 to 78F and 80 to 90% humidity. Both figures are tighter than most isopod species tolerate.
Heat is the more dangerous of the two. Rubber duckies come from caves where temperature barely moves, and sustained exposure above about 80F causes colony crashes that keepers often blame on something else. They need no supplemental heating in a normally heated home. If your room reaches the low 80s in summer, move the bin to the coolest floor level spot you have, or a basement.
For humidity, the combination of a drainage layer, deep substrate, a mostly closed lid, and sphagnum moss should hold the range without daily intervention. Check by eye rather than by gauge: the wet third should look dark and the leaf litter above it should stay pliable rather than crisp.
Never let the bin dry out completely, even briefly. A single forgotten fortnight in summer will undo a year of colony growth.
Diet and Feeding
Leaf litter and decaying hardwood are the staple, not a supplement. A well stocked bin should always have more litter than the colony can get through, and topping it up every couple of months is most of the feeding you do.
Beyond that:
Calcium, permanently available. Cuttlebone, crushed eggshell, or a chunk of limestone left on the surface. They will use it visibly.
Protein, sparingly. A pinch of fish flake, a freeze dried shrimp, or a small piece of dried river shrimp once every two to three weeks. Protein drives breeding, and it also drives mite explosions when overdone, so err low.
Vegetables, occasionally. Small pieces of carrot, cucumber, courgette, or squash. Remove anything uneaten within 48 hours.
What to skip: citrus, anything salted, anything from a treated garden, and any commercial food you cannot verify. General principles on isopod diet are covered in what isopods actually eat, and rubber duckies fit the standard detritivore pattern with a heavier calcium requirement.
Add springtails at setup. They compete for nothing the isopods want and they suppress mold, which matters far more in a high humidity bin than a dry one.
Behaviour and Handling
Expect a shy, slow animal. Rubber duckies cluster under bark and inside the litter layer, and a new colony may go weeks with almost no surface activity while it settles. That is normal and is not a sign of a problem.
They can be handled gently for photographs, though there is little reason to. They are small enough to injure with a clumsy grip and they conglobate, meaning they roll into a ball when disturbed, which makes a dropped isopod hard to find. Lift the bark they are sitting on instead of lifting the animal.
Signs a colony is unhappy: surface wandering during daylight, individuals dying with pale patches on the exoskeleton, or a population that has not increased in six months despite protein and calcium being available.
Breeding
Slow is the headline. A settled pair produces 8 to 20 young per brood, and broods come at intervals of a couple of months rather than weeks. Compare that to a Porcellio species turning out 40 at a time and you understand the pricing.
There is nothing to do beyond getting conditions right. No cycling, no cooling, no separation. Warmth at the upper end of the safe range, consistent humidity, calcium and periodic protein, and a colony left undisturbed will breed on its own schedule.
Expect roughly 6 to 12 months from a starter group of 10 before you see meaningful numbers, and 18 months or more before you have surplus to sell or trade. Do not judge progress by what you can see on the surface, because most of the colony is under the litter at any given time.
Because growth is this gradual, month to month counts are the only way to know whether things are working. Doing a rough count when you top up the litter and logging it in CrabPod, our free isopod and hermit crab care app turns an invisible trend into an obvious one. Broader lifespan and growth expectations across the genus are covered in our guide to the Cubaris panda king, which is the closest relative on the site in terms of care.
Keep them as a single species colony. Housing different Cubaris together risks hybridising lineages that took breeders years to establish.
Common Problems
Mold. Usually a ventilation shortfall combined with excess protein. Pull the food, add a few holes, add springtails.
Grain mites. White specks swarming on food remains. Remove the food source and reduce protein frequency. A heavy infestation usually needs a fresh bin.
Stalled colony. Almost always missing calcium, insufficient protein, or a bin that gets too warm in summer. Check all three in that order.
Bad molts. Calcium deficiency. Add limestone and cuttlebone.
Dieback after arrival. Some loss in the first month is common and reflects shipping stress. Leave the bin alone, keep it humid, and do not go digging to count survivors.
What Rubber Ducky Isopods Cost
Prices have fallen a long way. Early imports traded at well over $100 per individual, and the going rate now sits somewhere in the region of $20 to $50 each depending on lineage quality, marking clarity, and how well established the seller’s stock is. Starter groups of 10 are the usual unit of sale.
Two things affect what you should pay. Captive bred stock from a keeper with a mature colony survives far better than freshly imported animals, and clear symmetrical duck markings command a premium that has nothing to do with health. Buy the former, do not pay extra for the latter unless you care about it.
The species is still slow to reproduce, so prices are unlikely to collapse to Porcellio levels any time soon. If you want a broader look at what else is available at various price points, the species most keepers start with covers the range.
FAQ
Are rubber ducky isopods hard to keep?
Harder than a beginner species like dairy cows, easier than their reputation suggests. The demanding parts are holding 80 to 90% humidity without stagnant air, keeping temperatures under 80F, and providing constant calcium. Get those three right and they are undemanding.
Why are rubber ducky isopods so expensive?
Slow reproduction, small broods of 8 to 20, and demand driven by their appearance. A colony takes over a year to produce surplus, which keeps supply tight. Prices have still dropped from over $100 per isopod to roughly $20 to $50.
How long do rubber ducky isopods live?
Around 2 to 3 years in a stable colony, which is typical for the genus. Individuals molt throughout life, and a well established bin sustains itself indefinitely through overlapping generations rather than through individual longevity.
What do rubber ducky isopods eat?
Leaf litter and decaying hardwood as the staple, plus permanently available calcium from cuttlebone or limestone, occasional vegetables, and a small protein source every two to three weeks. Overfeeding protein causes mite outbreaks faster than anything else.
How many should I start with?
Ten to fifteen is the practical minimum. Smaller groups take longer to establish and leave no margin for the losses that follow shipping. Buying captive bred stock from an established colony matters more than buying a large number.
Can rubber ducky isopods live with other isopods?
Keep them alone. Mixing Cubaris species risks hybridisation, and faster breeding species will outcompete them for food and cover in the same bin. A single species colony is also far easier to count.
Track Your Colony with CrabPod
A rubber ducky colony grows slowly enough that progress is invisible week to week and obvious over six months, provided you wrote the numbers down. CrabPod lets you log population counts, track humidity and temperature trends, and set reminders for leaf litter top ups and protein feeds. Free on the App Store.